
Key Takeaways
-
Proper accessibility lift pit drainage prevents water ingress and costly damage in heritage and public buildings.
-
Coordination between contractors, engineers, and lift specialists is vital to achieve compliance with UK standards.
-
The sump pit and conduit layout must be planned and sequenced carefully to ensure a smooth installation and long-term system reliability.
Who Is Responsible and Why It Matters
Who is responsible? The sump pump and drainage system are always supplied by others, but must comply with Sesame’s pit layout and clearances.
Why it matters: Incorrect sump or conduit positioning can obstruct the lift frame and delay commissioning. Early coordination prevents rework and ensures compliance with accessibility and safety regulations.
Introduction: The Hidden Challenge Beneath Accessibility Lifts
Water damage remains one of the most common hidden issues in UK accessibility lift installations, especially in heritage environments such as Victorian townhouses, listed churches, and public museums.
When a pit lacks proper drainage, pooled water can corrode components, short out electrics, and weaken the structure—causing delays and costly repairs that can exceed £5,000 per incident.
This article explains how to design and coordinate drainage for accessibility lifts to prevent those issues before they occur.
Problem: Why Lift Pit Drainage Often Fails
Poor communication between civil contractors, mechanical engineers, and lift installers often leads to errors such as:
-
Conduits cast too early or at the wrong height
-
Sump pits blocking lift baseplates
-
Insufficient fall levels for natural drainage
-
Oversized pumps that compromise installation clearances
In older UK buildings, limited excavation depth and the need to preserve historic materials add further complexity to drainage layouts.
Solution: Coordinated Accessibility Lift Pit Drainage Design
Effective drainage design requires early collaboration and strict sequencing.
From Sesame’s engineering experience, the following are best practice standards:
| Specification | Typical Range / Guidance |
|---|---|
| Pit Depth | 200–1600mm depending on lift model |
| Sump Pit Size | 300mm x 300mm x 400mm deep |
| Drainage Flow Rate | 20–30 litres per minute (minimum) |
| Reference Level | Top Step Riser (SCSR) at +370mm from plinth |
| Conduits | Two 100mm ducts on West wall for hydraulics & network cables |
| Lighting Conduits | Two 36mm conduits on East wall (by others) |
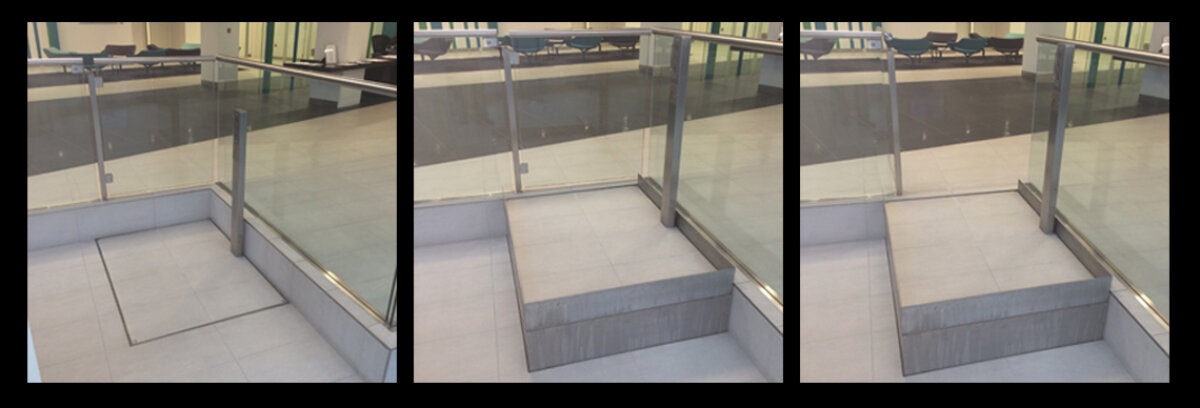
Key Coordination Sequence
-
Keep the pit clear during lift installation.
-
Lower and align the lift frame before any pipework is introduced.
-
Install the sump pit and drainage pipe after lift positioning.
-
Verify fall direction toward the sump (≥10mm/m).
-
Flood-test the pit to confirm full clearance in under 30 seconds.
This structured sequence avoids collision with fixing points or conduit damage during final alignment.
UK Context: Designing for Heritage and Public Buildings
For UK heritage sites, especially London-based accessibility projects, pit design often must adapt to uneven subfloors and existing waterproofing layers.
Sesame’s bespoke systems, such as the Wellington Lift, Kensington Stairlift, and Waterloo Lift, integrate seamlessly into such spaces with minimal excavation and high drainage resilience.
Each is tailored for listed environments where drainage and structure must work together invisibly beneath restored stonework or public access routes.
Best Practice: Inspection and Verification
-
Confirm pipe and conduit height relative to SCSR before concrete pour.
-
Ensure junction boxes for lighting circuits remain accessible but isolated from the lift zone.
-
Conduct a visual pit check before commissioning to ensure the sump remains unobstructed.
Problem–Solution Example
Problem: Water ingress during installation of a lift at a listed UK church caused corrosion in the hydraulic base.
Solution: The team repositioned the sump pit 150mm further from the West wall and re-routed conduits after lowering the lift frame, eliminating interference and ensuring reliable long-term drainage.
Frequently Asked Questions (FAQ)
Q: What’s the typical sump pit size for accessibility lifts?
A: 300mm x 300mm x 400mm deep, depending on site constraints.
Q: Should the sump pump be installed before or after the lift?
A: Always after lift installation to ensure no obstruction to the lowering frame.
Q: Who installs the sump pump?
A: It is supplied and installed by others, but must comply with Sesame’s pit drawings.
Q: What’s the reference point for pit measurements?
A: The Top Step Riser (SCSR) at +370mm from the plinth.
Q: What drainage rate should I aim for?
A: Minimum 20–30 litres per minute to prevent standing water in heavy rainfall or cleaning operations.
Summary
Effective accessibility lift pit drainage protects both safety and long-term performance.
By following Sesame’s coordinated sequencing and pit layout standards, contractors and architects can ensure every lift, whether in a London museum or heritage townhouse—operates reliably for decades.
Good drainage isn’t just a detail—it’s a foundation of accessibility engineering.
Call to Action
If you’re planning a UK accessibility project and want to discuss pit drainage or lift installation coordination,
book a Teams Meeting with one of our Project Managers here.