
Essential Pre-Installation Checklist
-
Understanding small tolerance changes early prevents delays and rework.
-
Coordinating trims, glass thickness, and floor build-up ensures perfect alignment.
-
Pre-install wiring, pit support, and floor levels must be completed before commissioning.
-
Delivery access and lifting plans need confirming well in advance.
-
On-site finishing (including painting) avoids unnecessary costs.
-
Hidden lift systems such as the Wellington Lift, Pimlico Lift and Buckingham Listed Building Lift adapt well to constrained sites.
-
Clear communication between contractors and lift engineers ensures a smooth installation from delivery to commissioning.
Introduction
A successful hidden lift installation depends on precise planning, accurate tolerances, and coordinated site preparation. Even small changes in floor build-up, glass thickness, or trim locations can impact the final fit and commissioning process. This guide brings together the seven most important preparations contractors should complete ahead of installation. It draws on real-world engineering discussions and is supported by additional resources such as the lifting plan coordination guide and international platform lift installation guidelines.
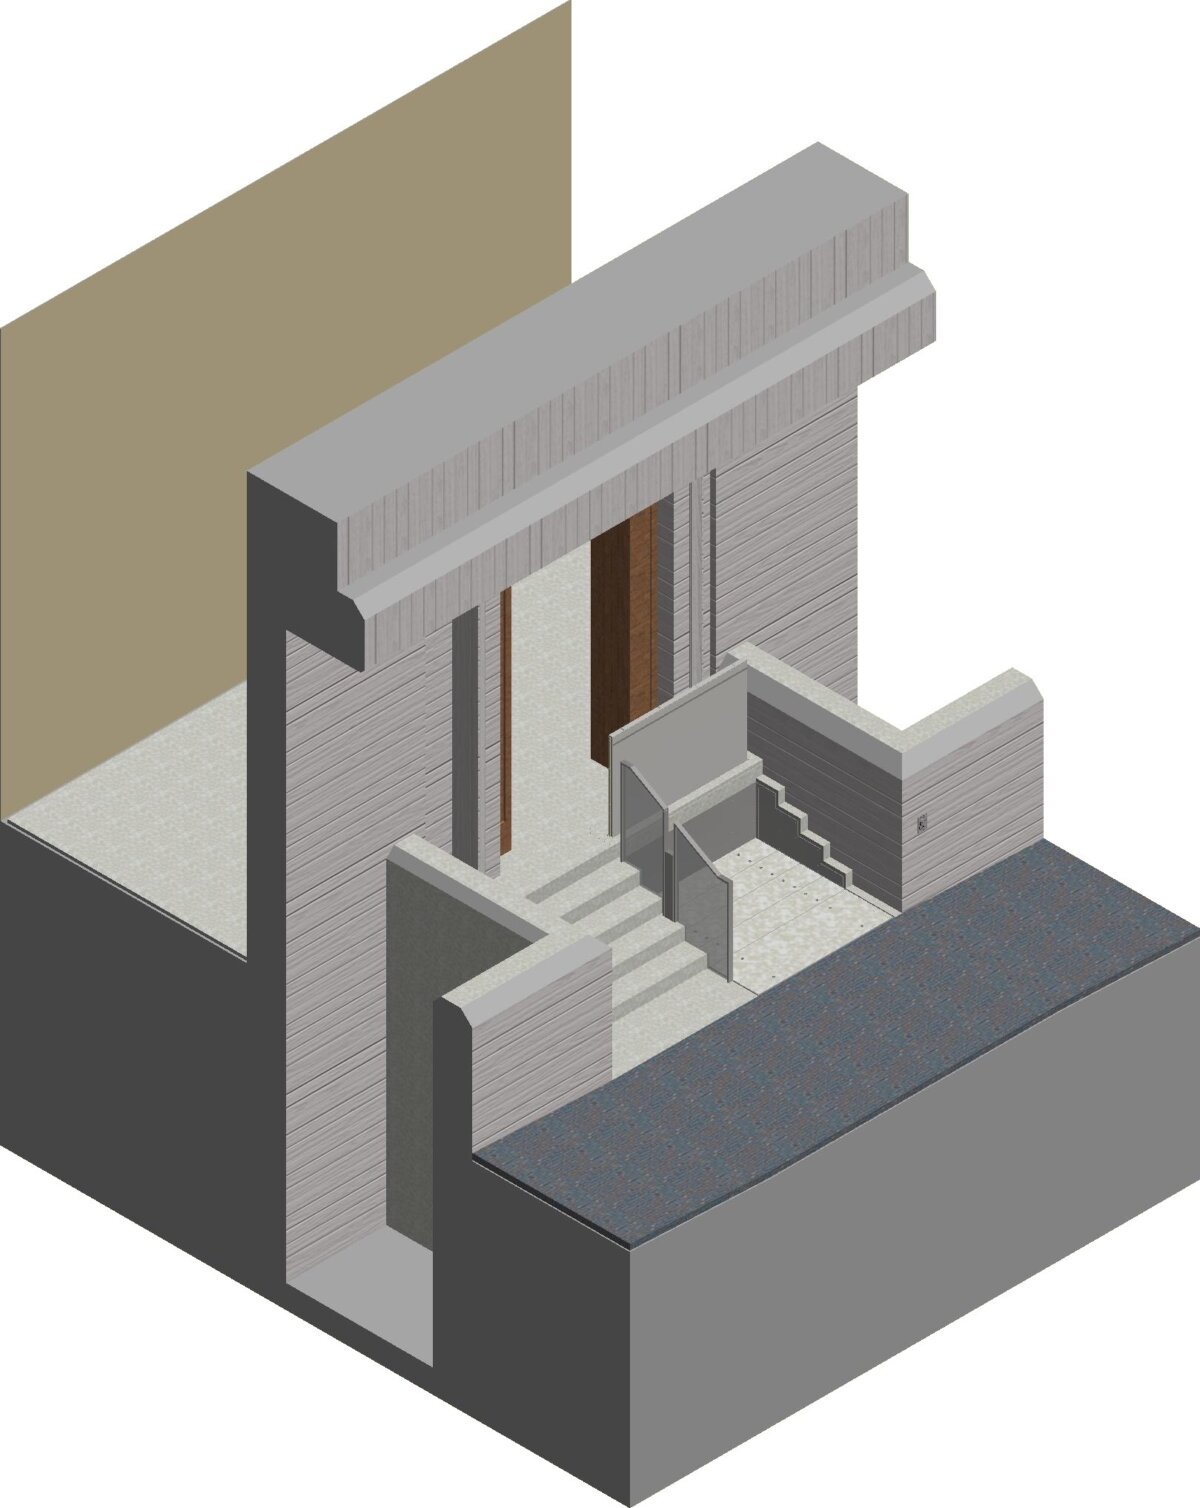
1. Confirm All Floor Level Tolerances
Hidden lifts must align perfectly with surrounding finishes. A change as small as 10–11 mm may require new service hatches, modified doors, extra trim blocks, or adjustments to maintain seamless integration. Planning this early avoids expensive rework and ensures that architectural finishes remain undisturbed.
For related guidance, see how to conduct a technical pit inspection before installation.
2. Prepare Trims and Surrounding Finishes
If trims have already been installed on site, it is often more efficient to leave them in place and apply final finishes on site. In many cases, a small aluminium block can be added under the lower landing door to accommodate any change in floor height. This avoids removing completed wall surfaces and allows surrounding works to continue uninterrupted.
Systems such as the Wellington Lift and Pimlico Lift have components that can be adapted with precision to accommodate these changes.
You may also find the heritage lift installation guide useful for planning finish integration in sensitive buildings.
3. Finalise Glass and Riser Dimensions
Glass location and thickness directly affect safety clearances. A typical configuration is 8+8 mm laminated glass, sitting within a 24–25 mm profile channel. The offset between the glass and lift trims must remain within European tolerance requirements, generally between 10–20 mm. Ensuring this dimension is locked in allows the lift to move freely without risk of contact.
4. Install Button Stations and Wiring Before Arrival
The lift cannot be commissioned unless the upper and lower landing push stations are fully installed, wired, and tested. Button stations should be completed before the installation team returns to site. This ensures engineers can complete functional testing without requiring additional visits.
For more detail on preparing control routing, see the installation guidance.
5. Ensure the Pit Structure Is Ready
A structural support block, often referred to during coordination as a base support or “yellow box”, must be installed in the lift pit. This ensures safe load distribution beneath the lift. Because hidden lifts rely on precise pit geometry, this step is essential for commissioning.
To understand how pit preparations connect with overall lift safety, refer to the lifting plan coordination process.
6. Prepare the Delivery Access Route
A hidden lift typically weighs between 1.5 and 2 tonnes when delivered. The site must provide:
-
A legally reserved unloading bay
-
A level route from roadside to door
-
Either a permanent ramp or temporary timber ramp
-
Clearances wide enough for a pallet truck
-
Confirmation that local authorities approve the delivery vehicle size
Contractors should review the lifting plan coordination article for an in-depth checklist.
7. Complete Floor Build-Up for Safe Installation
The floor level around the lower landing must be flush with the installed trims before the lift arrives. This creates a safe rolling surface for positioning the lift during installation. If final finishes are not ready, the contractor should temporarily install a level MDF or plywood surface.
This requirement helps avoid damage to trims or stonework and ensures accurate commissioning.
How Do Sesame Lifts Adapt to Complex Sites?
Sesame lifts are designed to integrate into highly constrained architectures. Systems such as the Pimlico Lift, Wellington Lift, and Buckingham Listed Building Lift allow precise adjustment for varying trim depths, floor build-ups, and glass tolerances. This flexibility is essential in locations where finishes continue to evolve during construction.
Frequently Asked Questions (FAQ)
What if floor levels change after manufacturing?
Minor changes can be accommodated with trim blocks, new hatches, or door modifications. Larger changes may require remanufacturing.
Do trims need to be removed if finishes change?
Usually not. Most trims can be left in place and painted on site unless major structural changes occur.
How close can glass panels be to the lift?
Typically within 10–20 mm depending on the model and compliance requirements.
Can lift components be painted on site?
Yes. On-site painting is often preferred, especially where final adjustments or touch-ups are needed.
What must be ready before commissioning?
Wiring, button stations, pit structure, floor level build-up, unobstructed delivery access, and confirmation of glass installation timing.
Next Step
For a tailored review of your project, please book a meeting with one of our Project Managers:
https://www.sesameaccess.com/book-a-meeting